# Execution begins at address 0
.pos0irmovqstack,%rsp# Set up stack pointer
callmain# Execute main program
halt# Terminate program
# Sample linked list
.align8ele1:.quad0x00d.quadele2ele2:.quad0x0e0.quadele3ele3:.quad0xf00.quad0main:irmovqele1,%rdicallsum_list# call sum_list(list_ptr ls)
ret# /* sum_list - Sum the elements of a linked list */
# long sum_list(list_ptr ls) {
# long val = 0;
# while (ls) {
# val += ls->val;
# ls = ls->next;
# }
# return val;
# }
sum_list:xorq%rax,%rax# val = 0
andq%rdi,%rdi# set CC
jmptest# goto test
loop:mrmovq(%rdi),%rsi# get ls->val
addq%rsi,%rax# val += ls->val
mrmovq8(%rdi),%rdi# ls = ls->next
andq%rdi,%rdi# set CC
test:jneloopret.pos0x200stack:
.pos0irmovqstack,%rspcallmainhalt.align8array:.quad0xbca.quad0xcba.quad0xacb.quad0xcab.quad0xabc.quad0xbac################################################################################
# You may want to modify this portion
bubble_a:rrmovq%rdi,%rdxaddq%rsi,%rdx# last = data + count - 1
loop1:# rcx <- i, rdx <- last
rrmovq%rdi,%rcxloop2:# if a[i] > a[i + 1]
mrmovq8(%rcx),%r8# *(i + 1)
mrmovq(%rcx),%r9# *i
subq%r8,%r9# *i <= *(i + 1)
jlecontinueswap:mrmovq8(%rcx),%r8# t = *(i + 1)
mrmovq(%rcx),%r9rmmovq%r9,8(%rcx)# *(i + 1) = *i
rmmovq%r8,(%rcx)# *i = t
continue:# i++
irmovq$8,%r8addq%r8,%rcx# compare i, last
rrmovq%rdx,%r8subq%rcx,%r8# last - i > 0
jgloop2irmovq$8,%r8subq%r8,%rdx# last --
rrmovq%rdx,%rcxsubq%rdi,%rcx# last - data > 0
jgloop1# if last > data jump
retmain:irmovqarray,%rdiirmovq$40,%rsicallbubble_aret.pos0x200stack:
boolinstr_valid=icodein// CMOVX is the same as RRMOVQ
{NOP,HALT,CMOVX,IRMOVQ,RMMOVQ,MRMOVQ,OPQ,IOPQ,JX,CALL,RET,PUSHQ,POPQ};// Does fetched instruction require a regid byte?
boolneed_regids=icodein{CMOVX,OPQ,IOPQ,PUSHQ,POPQ,IRMOVQ,RMMOVQ,MRMOVQ};// Does fetched instruction require a constant word?
boolneed_valC=icodein{IOPQ,IRMOVQ,RMMOVQ,MRMOVQ,JX,CALL};
在 decode 阶段需要计算 valB 和 dstE ,修改如下 :
1
2
3
4
5
6
7
8
9
10
11
12
13
14
15
16
17
18
19
// What register should be used as the B source?
u8srcB=[icodein{OPQ,IOPQ,RMMOVQ,MRMOVQ}: ialign.rB;icodein{PUSHQ,POPQ,CALL,RET}: RSP;true: RNONE;// Don't need register
];@set_input(reg_read,{srcA: srcA,srcB: srcB,});// What register should be used as the E destination?
u8dstE=[icodein{CMOVX}&&cnd: ialign.rB;icodein{IRMOVQ,OPQ,IOPQ}: ialign.rB;icodein{PUSHQ,POPQ,CALL,RET}: RSP;true: RNONE;// Don't write any register
];
同理对 execute 修改 :
1
2
3
4
5
6
7
8
9
10
11
12
13
14
15
16
17
18
19
// Select input A to ALU
u64aluA=[icodein{CMOVX,OPQ}: reg_read.valA;icodein{IRMOVQ,RMMOVQ,MRMOVQ,IOPQ}: ialign.valC;icodein{CALL,PUSHQ}: NEG_8;icodein{RET,POPQ}: 8;// Other instructions don't need ALU
];// Select input B to ALU
u64aluB=[icodein{RMMOVQ,MRMOVQ,OPQ,IOPQ,CALL,PUSHQ,RET,POPQ}: reg_read.valB;icodein{CMOVX,IRMOVQ}: 0;// Other instructions don't need ALU
];// Should the condition codes be updated?
boolset_cc=icodein{OPQ,IOPQ};
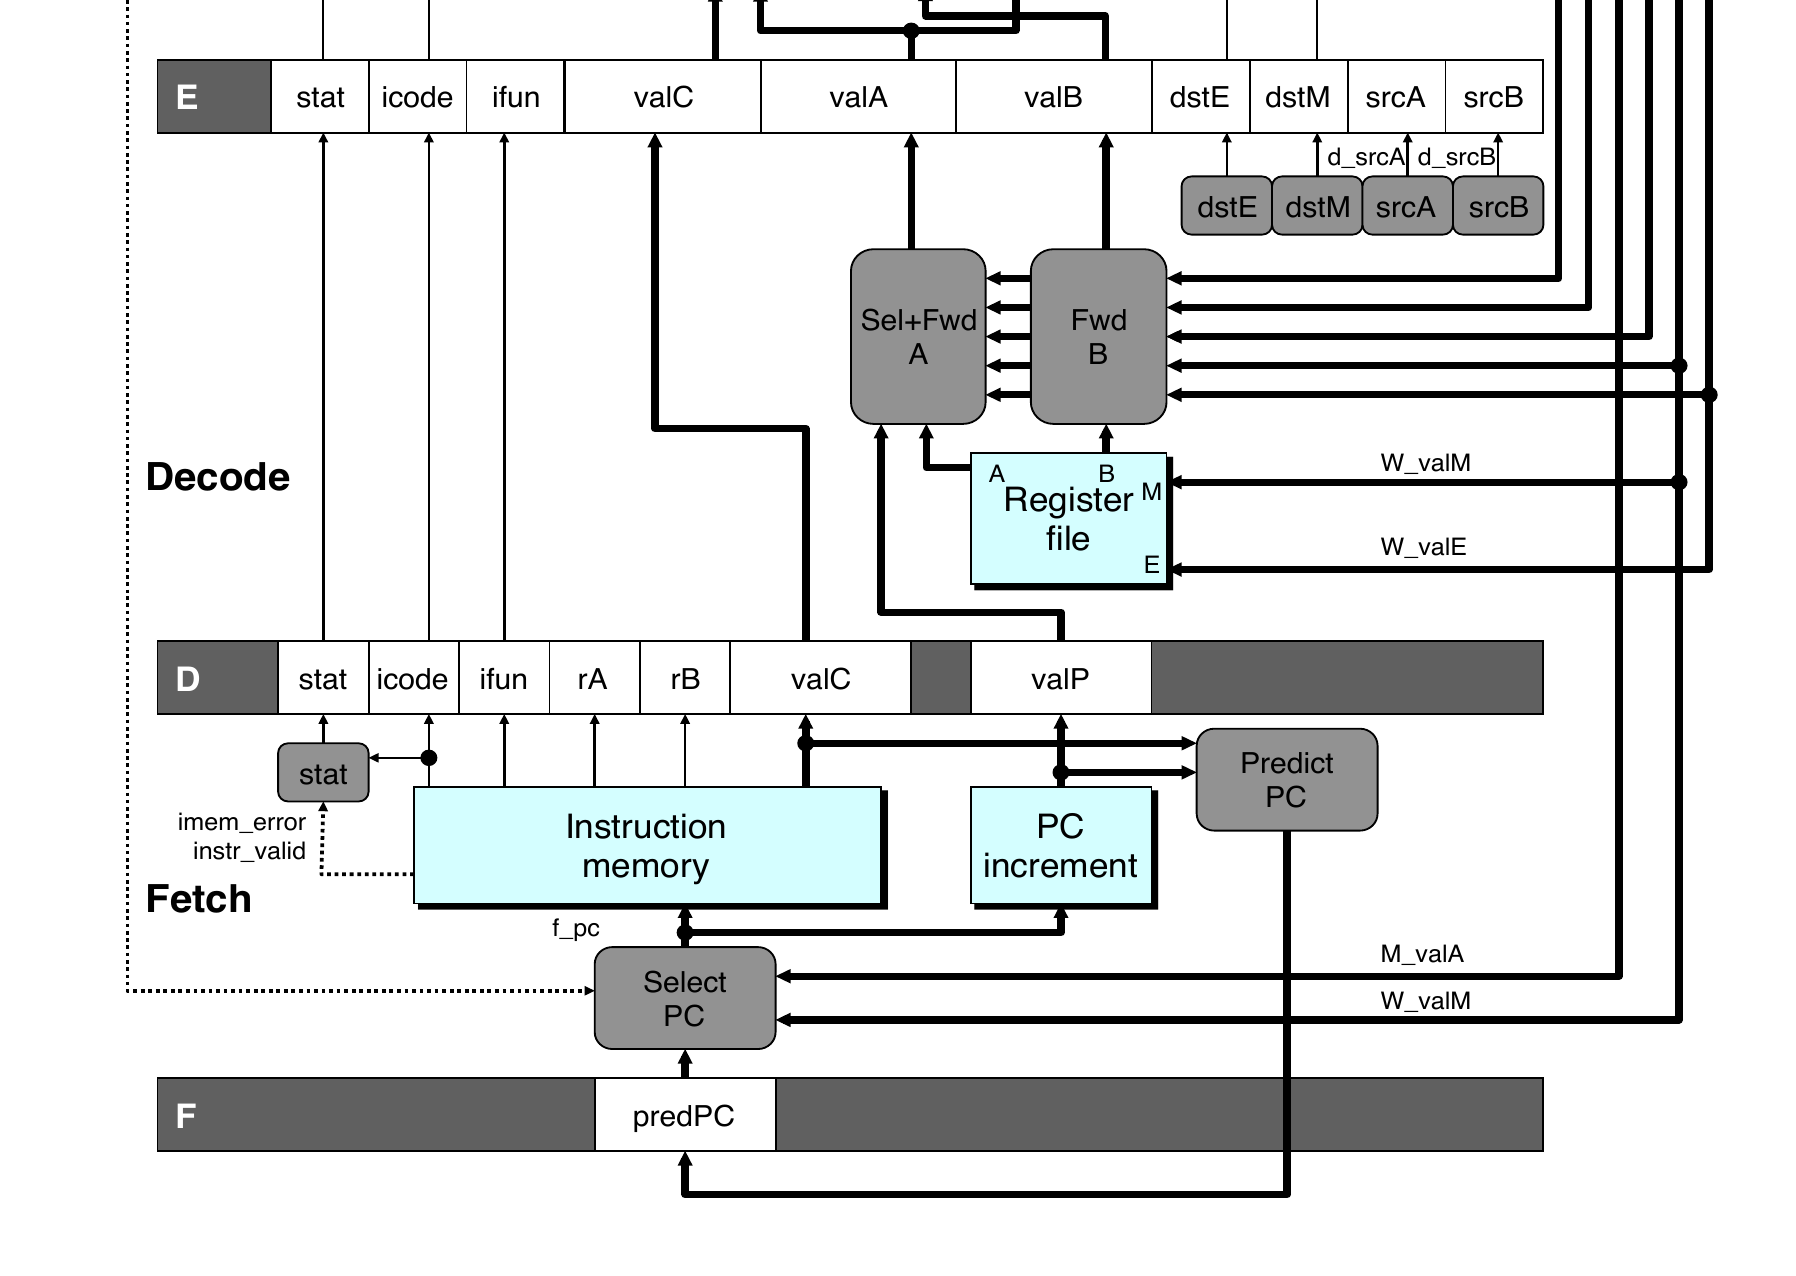
根据 pipes3a 的注释,我们把 D 阶段拆分出 E 阶段,但是这就会导致数据冒险的发生,也需要修改 f_pc 的逻辑。
1
2
3
4
5
6
//! 1. `reg_read` and `reg_write` are now in different pipeline stages, which
//! can lead to data hazards.
//! 2. The operands used in the calculation of `f_pc` are also split across
//! different pipeline stages, which is actually incorrect because values in
//! different pipeline stages at a specific time belong to different
//! instructions.
首先我们修改 f_pc 的选择逻辑 :
 1
 2
 3
 4
 5
 6
 7
 8
 9
10
11
12
13
14
15
16
// What address should instruction be fetched at?
// We use D.icode because we use the icode in the last cycle to determine the
// next PC.
u64f_pc=[// Call. Use instruction constant
// If the previous instruction is CALL, the constant value should be the next PC
// valC is from Fetch Stage, thus the last cycle
D.icode==CALL: D.valC;// Taken branch. Use instruction constant
E.icode==JX&&e_cnd: E.valC;// Completion of RET instruction. Use value from stack
// valM is from DEMW stage, thus the current cycle
E.icode==RET: e_valM;// Default: Use incremented PC
1: F.valP;];
此时还没有实现 PC 预测的逻辑,我们对着 SEQ+ 的逻辑进行修改就行了。
如果 E 阶段的 icode 是 JX 并且 cc 是 true ,那么就使用 valC ,否则使用 valP 。
如果 E 阶段的 icode 是 RET ,此时 PC 需要被设置为栈里面储存的值也就是 e_valM。
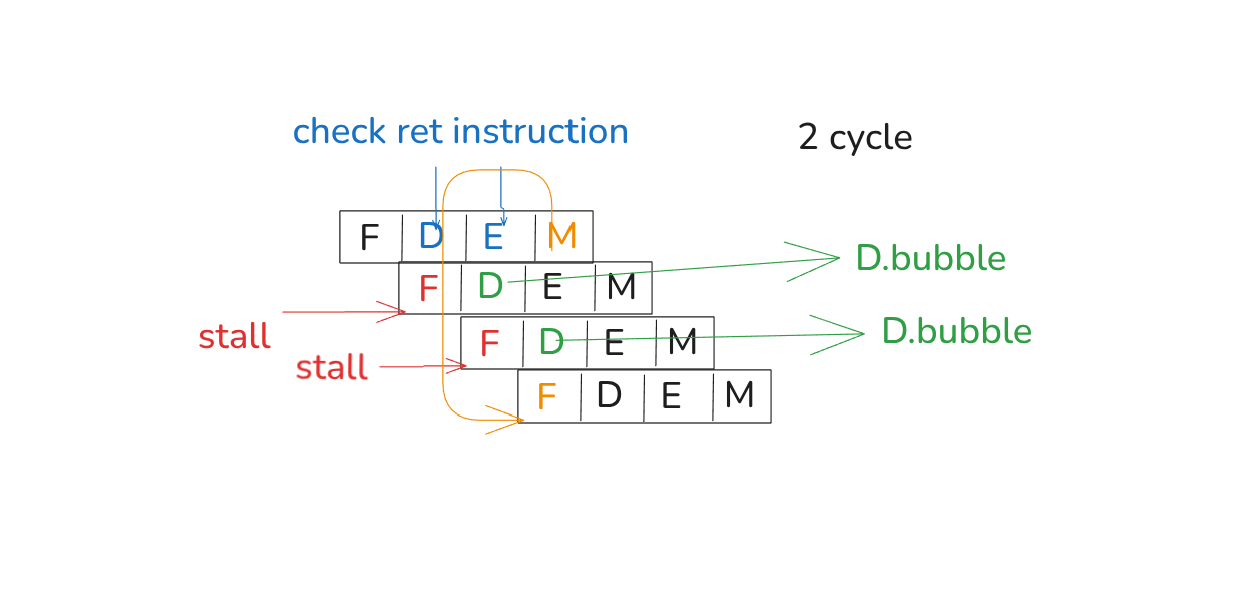
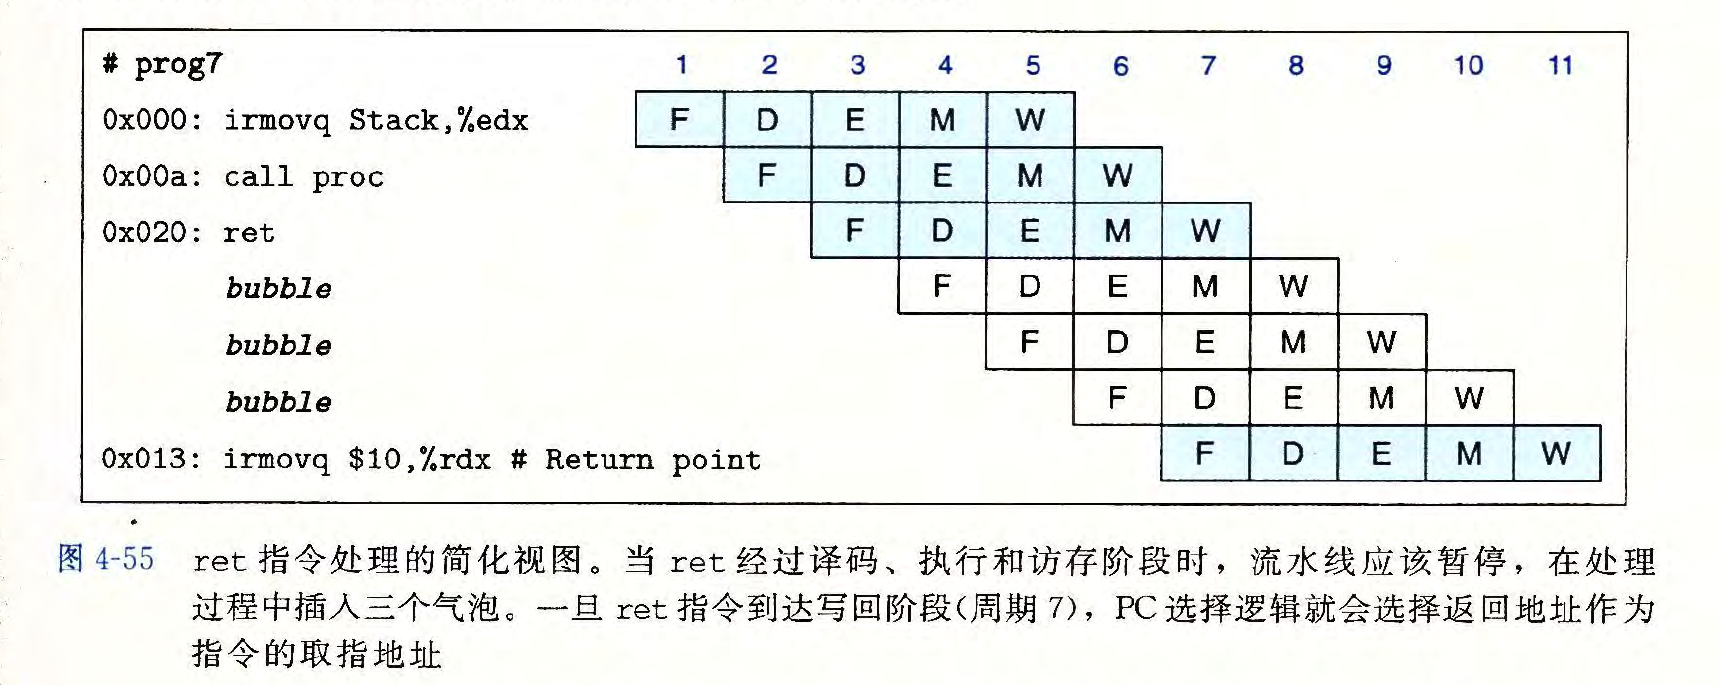
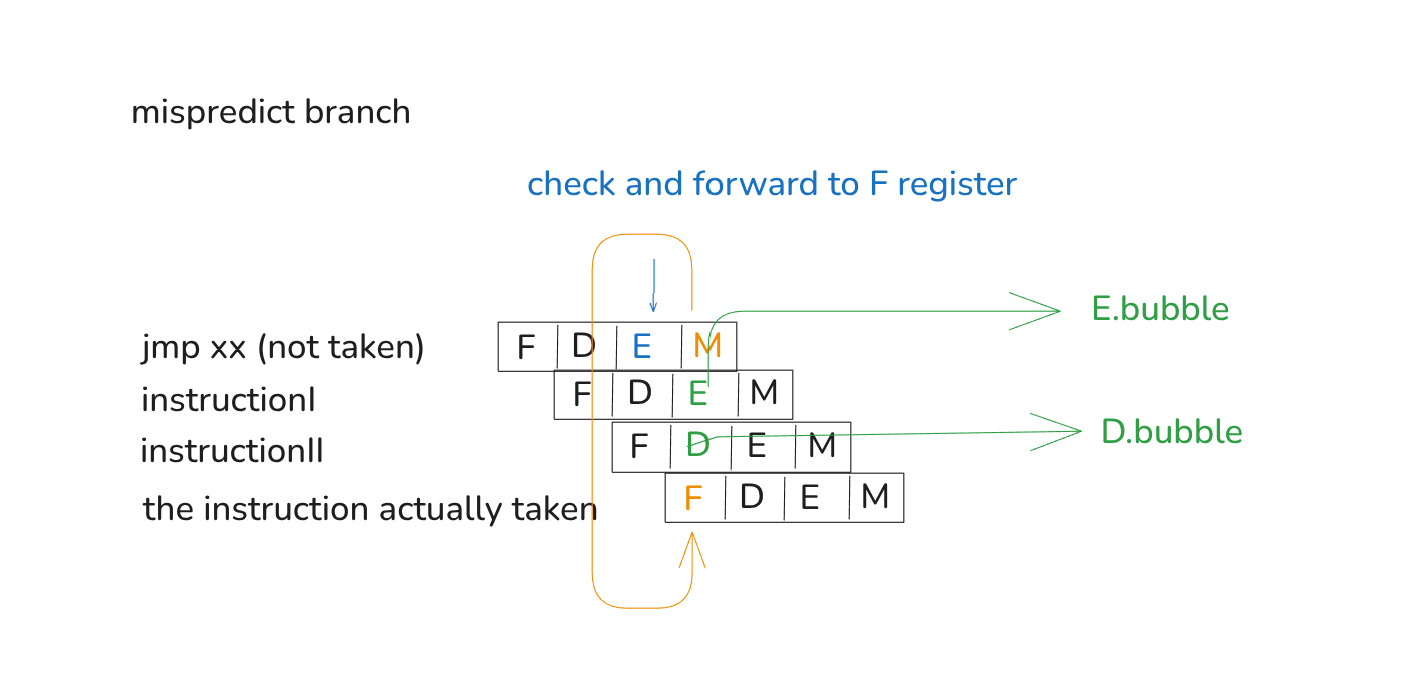
当发生写后读 (RAW) 数据冒险时,此时指令一处于 E 阶段, 指令 2 处于 D 阶段,指令 2 需要读取的寄存器正在被指令 1 写入,此时需要将指令 1 的计算结果直接转发给指令 2 ,让指令 2 的 E 阶段结果保持正确。
但是此时并没有实现旁路转发的逻辑,所以流水线不得不对 F 和 D 进行暂停同时对 E 插入 bubble 以等待正确的结果被写入目的寄存器。
P.S. 写到这里的时候我还在想这里为什么要暂停,原来是我忘记了还可以等待。
JX 和 RET 指令也是同样的逻辑,等待正确结果计算出来。
pipes3b 就对 pipes3a 总是暂停流水线这一行为进行了优化,实现了旁路转发。
 1
 2
 3
 4
 5
 6
 7
 8
 9
10
11
// forward data in RAW hazards
u64d_valA=[d_srcA==e_dstE: e_valE;d_srcA==e_dstM: e_valM;1: reg_read.valA;];u64d_valB=[d_srcB==e_dstE: e_valE;d_srcB==e_dstM: e_valM;1: reg_read.valB;];
// What address should instruction be fetched at?
// We use D.icode because we use the icode in the last cycle to determine the
// next PC.
u64f_pc=[// Call. Use instruction constant
// If the previous instruction is CALL, the constant value should be the next PC
// valC is from Fetch Stage, thus the last cycle
D.icode==CALL: D.valC;// Branch misprediction. Use incremental PC
E.icode==JX&&!e_cnd: E.valP;// Completion of RET instruction. Use value from stack
// valM is from DEMW stage, thus the current cycle
E.icode==RET: e_valM;// Default: Use predicted PC
1: F.pred_pc;];
// If a branch misprediction is detected during the Execute stage, it means that
// the instruction currently in the Decode stage is invalid. Therefore, the next
// cycle’s Execute stage needs to insert a bubble.
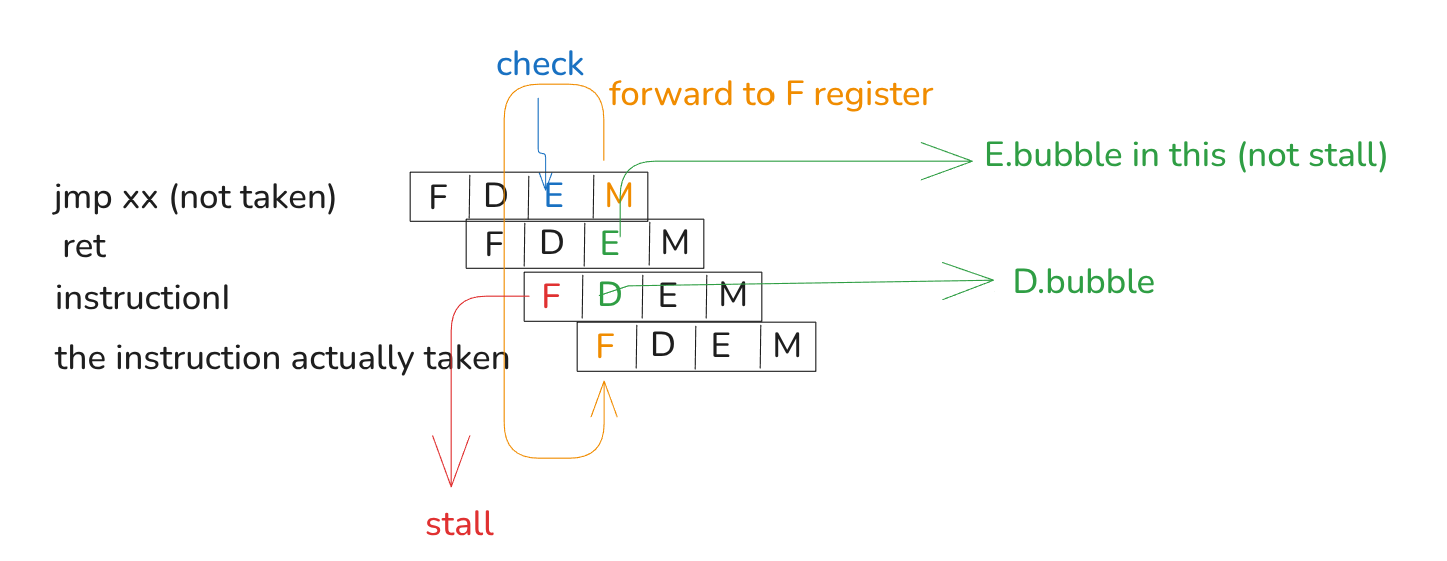
boolbranch_mispred=E.icodein{JX}&&!e_cnd;// If the current instruction in the Decode stage is a RET, then the instruction
// in the current Fetch stage is invalid. Therefore, the next cycle’s Fetch stage
// needs to insert a bubble.
boolret_harzard=D.icode==RET;// If both a branch misprediction and a RET hazard occur at the same time, since
// the jump instruction is executed before the RET, the RET should not have been
// executed, so a stall is not needed.
boolf_stall=ret_harzard&&!branch_mispred;@set_stage(f,{stall: f_stall,});boold_stall=false;// If both a branch misprediction and a ret hazard occur at the same time,
// since the jump instruction is executed before the RET, the RET should not
// have been executed. Therefore, a bubble is not needed.
boold_bubble=ret_harzard&&!branch_mispred;@set_stage(d,{stall: d_stall,bubble: d_bubble,});boole_bubble=branch_mispred;
// What address should instruction be fetched at?
// We use D.icode because we use the icode in the last cycle to determine the
// next PC.
u64f_pc=[// Call. Use instruction constant
// If the previous instruction is CALL, the constant value should be the next PC
// valC is from Fetch Stage, thus the last cycle
D.icode==CALL: D.valC;// Branch misprediction. Use incremental PC
E.icode==JX&&!e_cnd: E.valP;// Completion of RET instruction. Use value from stack
// valM is from DEMW stage, thus the current cycle
M.icode==RET: m_valM;// Default: Use predicted PC
1: F.pred_pc;];
// If a branch misprediction is detected during the Execute stage, it means that
// the instruction currently in the Decode stage is invalid. Therefore, the next
// cycle’s Execute stage needs to insert a bubble.
boolbranch_mispred=E.icodein{JX}&&!e_cnd;// If a RET instruction is detected in either the Decode or Execute stage, then
// the instruction in the current Fetch stage is invalid. Therefore, a bubble
// needs to be inserted in the Fetch stage for the next cycle.
//
// In fact, when E.icode == RET, the instruction in the current Decode stage is
// also invalid, but because the D.icode in the previous cycle was RET, at this
// point D.icode == NOP, so there's no need to add a condition for e_bubble.
boolret_harzard=RETin{D.icode,E.icode};// This instruction needs to read from a register whose data was loaded from
// memory by the previous instruction, but the previous instruction is still in
// the Execute stage, causing a data hazard.
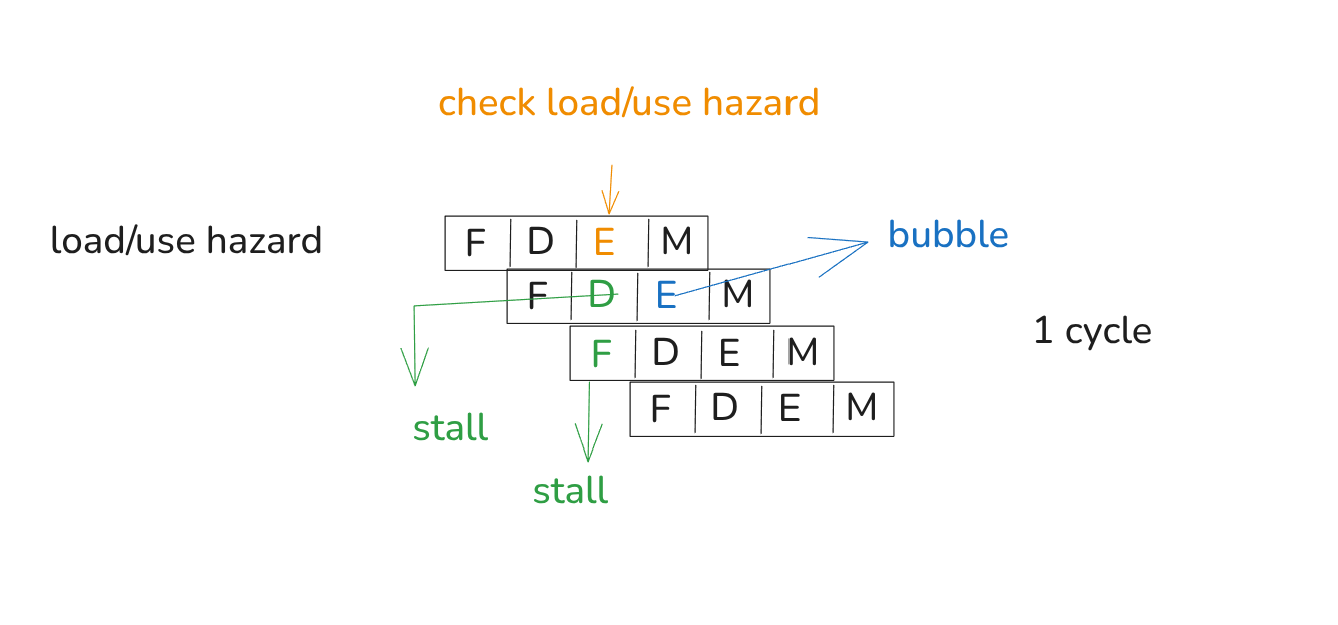
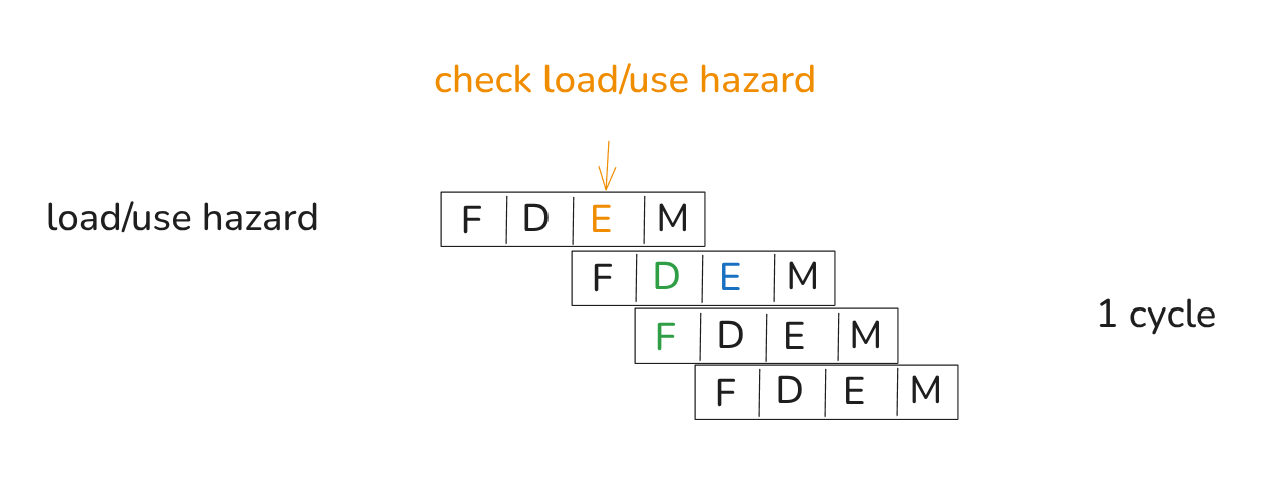
boolload_use_harzard=E.icodein{MRMOVQ,POPQ}&&E.dstMin{d_srcA,d_srcB};// an equivalent expression:
// bool load_use_harzard = E.dstM != RNONE && E.dstM in { d_srcA, d_srcB };
// If both a branch misprediction and a RET hazard occur at the same time,
// since the jump instruction is executed before the RET, the RET should not be
// executed, so no stall is required.
boolf_stall=ret_harzard&&!branch_mispred||load_use_harzard;@set_stage(f,{stall: f_stall,});boold_stall=load_use_harzard;// If both a branch misprediction and a RET hazard occur at the same time,
// since the jump instruction is executed before the RET, the RET should not
// have been executed, so a bubble is not needed.
//
// Actually, ret_harzard and d_stall cannot be true at the same time.
boold_bubble=ret_harzard&&!branch_mispred&&!d_stall;@set_stage(d,{stall: d_stall,bubble: d_bubble,});boole_bubble=branch_mispred||load_use_harzard;
// If a branch misprediction is detected during the Execute stage, it means that
// the instruction currently in the Decode stage is invalid. Therefore, the next
// cycle’s Execute stage needs to insert a bubble.
// bool branch_mispred = E.icode in {JX} && !e_cnd;
boolbranch_mispred=E.icodein{JX}&&!e_cnd;// If a RET instruction is detected in either the Decode or Execute stage, then
// the instruction in the current Fetch stage is invalid. Therefore, a bubble
// needs to be inserted in the Fetch stage for the next cycle.
//
// In fact, when E.icode == RET, the instruction in the current Decode stage is
// also invalid, but because the D.icode in the previous cycle was RET, at this
// point D.icode == NOP, so there's no need to add a condition for e_bubble.
boolret_harzard=RETin{D.icode,E.icode};// This instruction needs to read from a register whose data was loaded from
// memory by the previous instruction, but the previous instruction is still in
// the Execute stage, causing a data hazard.
boolload_use_harzard=E.icodein{MRMOVQ,POPQ}&&E.dstMin{d_srcA,d_srcB};// an equivalent expression:
// bool load_use_harzard = E.dstM != RNONE && E.dstM in { d_srcA, d_srcB };
// Unlike in `pipe_s4a`, here we do not need to consider the case of branch
// misprediction (since in the next cycle, Fetch will always get the `f_pc`
// from `M.valP`).
boolf_stall=ret_harzard||load_use_harzard;@set_stage(f,{stall: f_stall,});boold_stall=load_use_harzard;// Unlike in `pipe_s4a`, when a branch misprediction occurs, we directly insert
// a bubble, because the instruction in the Fetch stage at that point is invalid.
// Actually, ret_harzard and d_stall cannot be true at the same time.
boold_bubble=branch_mispred||ret_harzard&&!d_stall;@set_stage(d,{stall: d_stall,bubble: d_bubble,});boole_bubble=branch_mispred||load_use_harzard;
你可能会疑惑,这个 D 里面的 bubble 能不能去掉呢,它看起来很没必要,事实上是可以的。
不过在如上特殊情况,流水线又要多暂停一个周期,多少有点得不偿失。
去掉 D 里面的 bubble 也是正确的,可以通过测试。
pipes4c 告诉我们需要整合 D.vaP 到 d_valA 里面,这个要求很简单。
1
2
3
4
5
6
7
8
9
10
11
12
13
14
15
16
// What address should instruction be fetched at?
// We use D.icode because we use the icode in the last cycle to determine the
// next PC.
u64f_pc=[// Call. Use instruction constant
// If the previous instruction is CALL, the constant value should be the next PC
// valC is from Fetch Stage, thus the last cycle
D.icode==CALL: D.valC;// Branch misprediction. Use incremental PC
M.icode==JX&&!M.cnd: M.valA;// Completion of RET instruction. Use value from stack
// valM is from DEMW stage, thus the current cycle
M.icode==RET: m_valM;// Default: Use predicted PC
1: F.pred_pc;];
和
1
2
// We've feed D.valP into d_valA. Thus M.valP is not needed.
u64mem_data=M.valA;
彻底搞定。
1
cargo build && ./target/debug/grader part-b
Part-c
part-c 需要你优化 ncopy.ys 的性能,这里引入两个概念:流水线 $CPE$ 和 $Arch\ cos t$。
################################################################################
# ncopy.ys - Copy a src block of len words to dst.
# Return the number of positive words (>0) contained in src.
#
# Include your name and ID here.
#
# Describe how and why you modified the baseline code.
#
################################################################################
# Do not modify this portion
# Function prologue.
# %rdi = src, %rsi = dst, %rdx = len
ncopy:################################################################################
# You can modify this portion
# Loop header
xorq%rax,%rax# count = 0;
irmovq$1,%rbp# rbp = 1
copy_block:isubq$8,%rdx# len >= 8 ? len -= 8
jgeLoop1iaddq$8,%rdxjmpRemainLoop1:# %rdi = src, %rsi = dst, %rdx = len
mrmovq(%rdi),%r8mrmovq8(%rdi),%r9mrmovq16(%rdi),%r10mrmovq24(%rdi),%r11mrmovq32(%rdi),%r12mrmovq40(%rdi),%r13mrmovq48(%rdi),%r14mrmovq56(%rdi),%rcxrmmovq%r8,(%rsi)rmmovq%r9,8(%rsi)rmmovq%r10,16(%rsi)rmmovq%r11,24(%rsi)rmmovq%r12,32(%rsi)rmmovq%r13,40(%rsi)rmmovq%r14,48(%rsi)rmmovq%rcx,56(%rsi)andq%r8,%r8jleNops1iaddq$1,%raxNops1:andq%r9,%r9jleNops2iaddq$1,%raxNops2:andq%r10,%r10jleNops3iaddq$1,%raxNops3:andq%r11,%r11jleNops4iaddq$1,%raxNops4:andq%r12,%r12jleNops5iaddq$1,%raxNops5:andq%r13,%r13jleNops6iaddq$1,%raxNops6:andq%r14,%r14jleNops7iaddq$1,%raxNops7:andq%rcx,%rcxjleNops8iaddq$1,%raxNops8:iaddq$64,%rdiiaddq$64,%rsijmpcopy_blockRemain:addq%rdx,%rdxaddq%rdx,%rdxaddq%rdx,%rdxirmovqJmpTable,%r8addq%r8,%rdxmrmovq(%rdx),%rdxpushq%rdxretRemainder7:mrmovq48(%rdi),%r8rmmovq%r8,48(%rsi)xorq%r9,%r9# temp = 0
andq%r8,%r8# check val
cmovg%rbp,%r9# temp = 1 if > 0
addq%r9,%rax# count += temp
Remainder6:mrmovq40(%rdi),%r8rmmovq%r8,40(%rsi)xorq%r9,%r9andq%r8,%r8cmovg%rbp,%r9addq%r9,%raxRemainder5:mrmovq32(%rdi),%r8rmmovq%r8,32(%rsi)xorq%r9,%r9andq%r8,%r8cmovg%rbp,%r9addq%r9,%raxRemainder4:mrmovq24(%rdi),%r8rmmovq%r8,24(%rsi)xorq%r9,%r9andq%r8,%r8cmovg%rbp,%r9addq%r9,%raxRemainder3:mrmovq16(%rdi),%r8rmmovq%r8,16(%rsi)xorq%r9,%r9andq%r8,%r8cmovg%rbp,%r9addq%r9,%raxRemainder2:mrmovq8(%rdi),%r8rmmovq%r8,8(%rsi)xorq%r9,%r9andq%r8,%r8cmovg%rbp,%r9addq%r9,%raxRemainder1:mrmovq(%rdi),%r8rmmovq%r8,(%rsi)xorq%r9,%r9andq%r8,%r8cmovg%rbp,%r9addq%r9,%raxDone:ret# In grader, we will add a "trap: jmp trap" here, which traps your program in an
# infinite loop. Thus your function should always return instead of falling
# through till the end of the source code :)
.align8JmpTable:.quadDone.quadRemainder1.quadRemainder2.quadRemainder3.quadRemainder4.quadRemainder5.quadRemainder6.quadRemainder7
此时我们可以拿到 Part C: all tests passed, cpe: 8.79433020157048, arch cost: 3, score: 60.0000 这样的好成绩。
我尝试过优化掉循环内部的 if 语句为 comvx,但结果出我意料,并没有比现有的 $8.8$ 快反而要慢 $0.1$。
################################################################################
# ncopy.ys - Copy a src block of len words to dst.
# Return the number of positive words (>0) contained in src.
#
# Include your name and ID here.
#
# Describe how and why you modified the baseline code.
#
################################################################################
# Do not modify this portion
# Function prologue.
# %rdi = src, %rsi = dst, %rdx = len
ncopy:################################################################################
# You can modify this portion
# Loop header
xorq%rax,%rax# count = 0;
irmovq$1,%rbp# rbp = 1
isubq$8,%rdx# if len < 8 jmp to remain
jlRemainLoop1:# %rdi = src, %rsi = dst, %rdx = len
mrmovq(%rdi),%r8mrmovq8(%rdi),%r9mrmovq16(%rdi),%r10mrmovq24(%rdi),%r11mrmovq32(%rdi),%r12mrmovq40(%rdi),%r13mrmovq48(%rdi),%r14mrmovq56(%rdi),%rcxrmmovq%r8,(%rsi)rmmovq%r9,8(%rsi)rmmovq%r10,16(%rsi)rmmovq%r11,24(%rsi)rmmovq%r12,32(%rsi)rmmovq%r13,40(%rsi)rmmovq%r14,48(%rsi)rmmovq%rcx,56(%rsi)andq%r8,%r8jleNops1iaddq$1,%raxNops1:andq%r9,%r9jleNops2iaddq$1,%raxNops2:andq%r10,%r10jleNops3iaddq$1,%raxNops3:andq%r11,%r11jleNops4iaddq$1,%raxNops4:andq%r12,%r12jleNops5iaddq$1,%raxNops5:andq%r13,%r13jleNops6iaddq$1,%raxNops6:andq%r14,%r14jleNops7iaddq$1,%raxNops7:andq%rcx,%rcxjleNops8iaddq$1,%raxNops8:iaddq$64,%rdiiaddq$64,%rsiisubq$8,%rdxjgeLoop1# rdx(len) >= 8
Remain:iaddq$4,%rdxjgeRootRight# len >= 4 right (4,5,6,7)
# len < 4 left (0,1,2,3)
RootLeft:# rdx : -4(0), -3(1), -2(2), -1(3)
iaddq$2,%rdxjgeLeftRightLeftLeft:# rdx : -2(0), -1(1)
iaddq$1,%rdxjeRemainder1retLeftRight:# rdx : 0(2), 1(3)
isubq$1,%rdxjeRemainder3jmpRemainder2RootRight:# rdx : 0(4), 1(5), 2(6), 3(7)
isubq$2,%rdxjgeRightRightRightLeft:# rdx : -2(4), -1(5)
iaddq$1,%rdxjeRemainder5jmpRemainder4RightRight:# rdx : 0(6), 1(7)
isubq$1,%rdxjeRemainder7jmpRemainder6Remainder7:mrmovq48(%rdi),%r8xorq%r9,%r9# temp = 0
rmmovq%r8,48(%rsi)andq%r8,%r8# check val
cmovg%rbp,%r9# temp = 1 if > 0
addq%r9,%rax# count += temp
Remainder6:mrmovq40(%rdi),%r8xorq%r9,%r9rmmovq%r8,40(%rsi)andq%r8,%r8cmovg%rbp,%r9addq%r9,%raxRemainder5:mrmovq32(%rdi),%r8xorq%r9,%r9rmmovq%r8,32(%rsi)andq%r8,%r8cmovg%rbp,%r9addq%r9,%raxRemainder4:mrmovq24(%rdi),%r8xorq%r9,%r9rmmovq%r8,24(%rsi)andq%r8,%r8cmovg%rbp,%r9addq%r9,%raxRemainder3:mrmovq16(%rdi),%r8xorq%r9,%r9rmmovq%r8,16(%rsi)andq%r8,%r8cmovg%rbp,%r9addq%r9,%raxRemainder2:mrmovq8(%rdi),%r8xorq%r9,%r9rmmovq%r8,8(%rsi)andq%r8,%r8cmovg%rbp,%r9addq%r9,%raxRemainder1:mrmovq(%rdi),%r8xorq%r9,%r9rmmovq%r8,(%rsi)andq%r8,%r8cmovg%rbp,%r9addq%r9,%raxDone:ret# In grader, we will add a "trap: jmp trap" here, which traps your program in an
# infinite loop. Thus your function should always return instead of falling
# through till the end of the source code :)
还有一个优化是将戳气泡再利用,举个例子,如果在 fall through 过程中,当前在 Remainder7 ,此时预加载 Remainder6 里面的数据来进行优化。这个思路很不错,但是先起来我发现不仅仅要修改 switch 语句,为了保证正确性,需要对二分的过程添加指令。结果优化过后的 $cpe$ 不降反升,属于是反向优化了。
1
Part C: all tests passed, cpe: 8.138233982888806, arch cost: 3, score: 60.0000

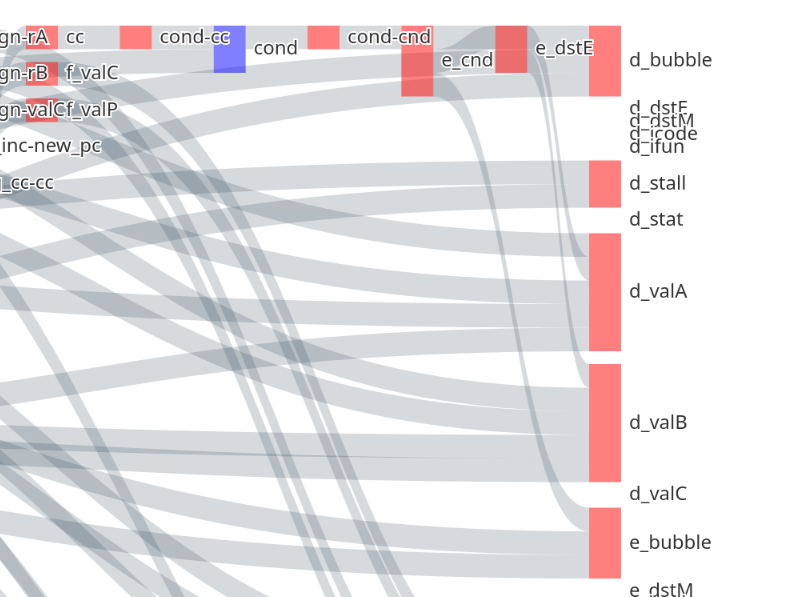
 在浏览器里面打开:
 当你的鼠标移到某个节点时,就像一个聚光灯让所有包含这个节点的链路高亮,依赖关系一目了然,真的很好用。